Header/Navigation Bar/Social Media Icons

Showing posts with label homeschool. Show all posts

Legos Unlocked: 15 Ways to Use Legos to Teach Math and Language Arts

Legos are great toys and one of the most creative tools that children can use.  Since children love them so much, they make for excellent Math and Language Arts manipulatives. For parents looking to offer new challenges to keep their kids learning, Legos are a fun medium to test both the parents’ and child’s creativity.


Addition – Write out simple addition equations on a piece of paper.  Leave enough space for your child to match the number of pegs on each block with the written number.  Or you could reverse it, place the pegs on the table and ask your child to write out the numbers that match the pegs.


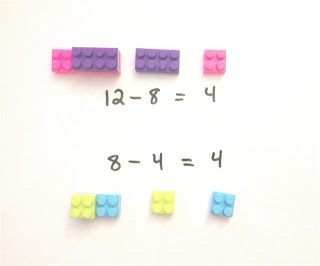
Subtraction – Place one Lego that has fewer pegs on top of another that has more to reveal subtraction concepts.  For example, a 12-peg Lego beneath an 8-peg Lego of the same color that is being subtracted, helps children to put quantities into groups.


Recognizing Patterns – Choose two or three different colors, and have your child create various pattern types.  Or create the pattern yourself and have your child to determine what the pattern is.


Comparing Numbers – Stack up blocks next to each other, and ask your child which one contains more.  Then demonstrate how the greater than/less than symbol indicates the amount as well.


Measuring – Take any toy that your child likes and use Legos to measure them.  Then ask how many Legos long is your toy?


Making Perfect Squares – Line up Legos so that they form multiplication arrays that display perfect squares.  For example, 2 x 2 is 4.  Then have your child to count the pegs represented in the answer.


Multiplication and Division – Use larger Legos or Duplos to show groups.  Three groups of eight make twenty four. Then write out the equation, 3 x 8 = 24.  You could also write out 8 + 8 + 8 = 24, to show that multiplication is repeated addition.


 Counting and Number Matching – This next one works better on bigger blocks, like Lego Duplos.  I used a small dry erase marker to write on the blocks.  They erase well with the wipe of a tissue.  Separate the blocks, write the numbers on them, then have your child to match them up.  This will help them learn to relate the cardinal number to the written number, and to the quantity – represented in the dots.


Putting the Alphabet in Order – Mix up blocks and spread them out, then have your child to put them in order.  Make this activity more fun by having your child sing the alphabet song while playing the game, or race against a timer.


Making Letters – Work with your child to creatively form as many letters as you can with the blocks.


Sentence Structure – Write a simple sentence, like the one below.  Mix up all the words, and have your child to place them in order, to form a complete sentence.

Prefixes – Write the prefix on the smaller block, and the root word on the larger block to demonstrate how the prefix changes the word.


Suffixes – Write the suffix on the smaller block, and the root word on the larger block to demonstrate how the suffix changes the word.


 Subject & Predicate – Write a basic sentence and then choose two large blocks on which to write ‘subject’ and ‘predicate.’ You can do this with nouns and verbs, or if your child is more advanced, use subjects and predicates.  But use the larger blocks to label the parts of the sentence, and smaller blocks to write the words.


Word Families/Rhyming Words – Use one similar color to write a list of rhyming words.  Point out the spelling of these words and point out how they are similar in sound and spelling.  Use the blocks to group them together.


Preschool African Studies: Libya


We are continuing our study of Africa with Libya.  I couldn't find a children's picture book that was from Libya so all of our resources are non-fiction.  We began by using a cut and paste worksheet I created for my daughter.  She traced the country name and capital.  Then we used the capital city to find out what the weather was like.  We used a compass rose to find out what region of Africa Libya is in and then she colored in Libya on the map of Africa.  She choose to use yellow to circle the region and color in the country.  We also studied the Mediterranean Sea using and An Illustrated Atlas of Africa. 

I love going through this study because I am learning right along with my child.  One thing I had to explain was that our books were outdated and some information has changed.  For example in the Atlas Libya's flag was a solid green, however their current flag is red black and green.  We looked up the history of the flag online.  We then looked though Libya by Terri Willis for pictures of the people of Libya, discussed how their currency looks different from ours, and how the people of Libya dressed.  She commented on the kids wearing scarves like the adults.


To conclude today's lesson, I had my daughter read a short passages about desserts from Readworks answer the review questions and locate the Sahara desert on the map.  
 

Follow our journey by subscribing to the blog :)

Also if you know of any fictional children's books that are from Libya, please share.    


Preschool African Studies: Egypt

Today we began a journey along with and inspired by Joyice of Raising Boys Homeschool and many other homeschool families.  This journey is a geographical study of the continent of Africa. In the following weeks I will share what we are learning, and if you feel inclined, join us in our study! 


Today we focused on Egypt. We read a neat alphabet book called Egypt ABC's that gave an overview of some popular Egyprian cultural icons and geography. We also read a chapter of African Princesses by Joyce Hansen. This chapter focused on Hatshepsut a powerful woman who was one of Egypts pharaohs. Also on our reading list was one page from Africa Is Not A Country, a children's book that profiles a slice of life for children across the continent of Africa.   Lastly, we read The Day of Ahmed's Secret. This story follows a young boy as he goes about his day keeping a secret he shares with his family at the end if the day. There is a part of the story where Ahmed observes a girl using a pulley to obtain something from a balcony. I asked my daughter if she knew what a pulley was, and she replied yes.  She said Sid The Science Kid used a pulley in one episode. PBS Kids for the win!

In addition to reading, I put together a little cut and paste handout that will be repeated for each nation. The handout requires the student to cut out the flag, capital city and a weather icon and paste it to the page. After pasting the capital city to the page, my daughter used the city to search for the weather using a weather app.

Then she choose the weather icon that matched the current weather and pasted it to the page. We then discussed why it was currently night time in Cairo and this continued into a science conversation about how the earth rotates as it circles the sun.  Finally we reviewed cardinal directions and she had to circle the region of Africa in which Egypt is located, then color in Egypt on the map on the bottom of the page.

For extra credit I offered an Egytian proven to trace to practice writing skills.  Day one of our African studies are under wrap :) 

Misty, John and Lamond: More Black Homeschooling Celebrities

I previously wrote about 12 Black celebrities were homeschooled as well as 5 Black celebrity parents who homeschooled their children.  Since posting those lists, I have discovered a few more celebrity homeschoolers.  Check them out!


Misty Copeland 

In her memoir, Life in Motion, Copeland writes: 

"The summer before I turned fifteen, we decided that it would be better for me to be homeschooled to allow more time for dance.  There was an independent study program a few blocks from our condo.  I would go there every couple of weeks to meet with a teacher, get new assignments, and be graded on the previous bundle of homework." 


John Legend

Many know about this Pop/R&B stars talent, but did you know that he was homeschooled for part of his academic life? John Legend speaks about his homeschool experience in an interview: 


Lamond Murray

Former NBA star Lamond Murray has played for the  Los Angeles Clippers, the Cleveland Cavaliers, the Toronto Raptors, and the New Jersey Nets.  In addition to his basketball career he is also a homeschool father and founder of Real Run Academy that offers PE classes to homeschoolers and other children.


Are we missing anyone? What do you think of these celebrities' decisions to homeschool? Please share.

7 Awesome Educational Websites for Kids

The internet is booming with online learning opportunities for young people.  Below are 7 websites that I have had a positive experience with.


PBS Kids Play
PBS Kids Play advertises itself as a “School Readiness” program that offers online learning games for children in Preschool through First Grade.  Multiple subjects are explored, from math, to early science, reading, music, social studies, emotional development and even foreign language!  What I like most is that all of the learning activities contain engaging characters and almost all of them are from one of the television shows on PBS such as Super Why!, Dinosaur Train, and Thomas the Tank Engine.  The website is meant for children ages 3 and up to work independently while parents are able to track their child's progress throughout the program.
There are free trials available, but full access requires a membership.   Both home and classroom plans are available for purchase.

2. IXL
ixl
IXL is a website that offers lots of practice questions for Math (from Preschool up through Algebra 2) and Language Arts, grades 2-6.  This is a good website if you are looking to assess your child’s knowledge and skill in a particular area.  All questions are aligned to state and common core standards.  The website allows you to answer 20 questions for free, but requires a membership for unlimited access to practice questions.  The questions are timed and your progress is scored.  Both home and classroom memberships are offered.  I think this is a good website simply for checking to see what your child should be learning at each grade level.  I don’t always have my daughter answer the questions via the website, however I do look at the questions and the standards at each grade level to get a sense of what she should be learning.  The few times that I have let my 3 year old answer questions via the website, the 20 question limit was enough to gauge her performance.  For members there are charts for student progress to let parents know how well their children are doing and what areas need improvement.

home_samson
Samson’s Classroom has 3 sections: Sight Words, Spelling and Reading Comprehension.   The sight word section has over 224 sight words that are commonly used in the English language.  The spelling section has over 5,000 spelling words and also allows the parent or teacher to customize the list and insert additional words.  In the reading comprehension section students read a passage and if they answer all the questions correctly they earn “hammer time,” which is the ability to play a short game.  I love that there are several levels of reading comprehension, however I wish there was a way to only allow students to read the higher level passages once they have mastered the prior level.  One thing that bothers me is that my daughter always wants to click on the passages that are too difficult for her. She gets frustrated if she answers one question incorrectly, because if she does not answer them all correctly she will not earn “hammer time.”   There are home and classroom subscriptions available.   The home subscription price was only $30 for a year.

Square_ReadWorks_Logo
I am in love with this site.  Readworks is a website that offers reading passages and questions that help students improve their reading comprehension skills. The passages can be downloaded and printed out and are organized by Lexile level, grade level, theme, and skill.   There are lessons plans for grades K-6 and reading passages for grades K-8.  Anyone, parent or teacher, can register for free access to all of the sites content.  I highly recommend parents whether homeschooling full time or supplemental, check out this site.

screenshot-large-khan
Initially a series of online tutorials, the Khan Academy has totally revolutionized free online learning.  I remember when the Khan Academy was in its beginning stages and only had videos.  I would use some of the videos in my classroom and refer students to watch them at home.  Now the website has evolved to allow users to take placement exams, engage in dialogue with other users and even “coach” others through lessons.   The “coach” is essentially a teacher or parent that sets up a classroom account that dictates what content they are able to access.  The Khan Academy covers topics from basic math to Biology and Art History. There is even SAT, MCAT, GMAT test prep and more.  To top it all off, all of the content is FREE!


A great way to supplement your child's education would be to introduce them to computer programming.  If classes are offered in your school district check them out and see if they would be a good fit for your child.  However, you can also have them learn these concepts at home.  Below are two websites I learned about through the “Hour of Code.” The “Hour of Code” was a day in which teachers across the country were encouraged to allow students to spend one hour learning about computer programming.  I participated by having my daughter “play” with these two websites.  Check out http://learn.code.org/ for more free computer programming courses.

Tynker is an online course that teaches young people the basics of computer programming.   There are two levels, beginning and intermediate, and both have a lifetime fee of $50.  So far we have only explored the free activities listed under “Hour of Code”.  Puppy Play time activity was a favorite with my daughter.

Lightbot can be accessed from an iPad, Android device or any computer with a web browser.  The goal is to light up all the blue squares using computer programming.  According to Lightbot documentation:
“Lightbot is a programming puzzle game. This means that at its core, it is a puzzle game, but its game mechanics lend themselves to actually having a one-to-one relationship with programming concepts.”
Although this activity is aimed at young children, it can be fun and addicting for adults as well.  


Do you subscribe to any online learning tools for your children?  Do you have any website to add to the list?  Please share :) 


20 Fun and Non-Traditional Ways to Use Flashcards

I remember when I first decided I wanted to teach my daughter to read.  I went to the dollar section at Target and found flashcards galore.   I purchased number flash cards, sight word flashcards, phonics flash cards and more.  I thought my daughter would love learning with them.  Little did I know she would have no interest in sitting down with me to learn using  flash cards in the traditional way.  Every time I pulled out the flash cards she became disengaged and when I let her have them she would either thrown them in the air or spread them all over the floor and just make a big mess playing with them.  That is when I realized I had the wrong approach for her learning style.  I had seen many videos of babies and toddlers sitting quietly with their parents as they reviewed flash cards, however I could not use the same approach for my child.  We still used flash cards, but not in the traditional way.  Below I will share some fun and non-traditional ways to use flash cards for lots of learning and fun.  These ideas can be used with purchased or homemade flash cards as well.  Enjoy.


1. Place your cards on a table or on the floor.  Call out the name of the card, (sight word, letters, shapes, or numbers) and have your child swat them with a fly swatter as they are being called out.
2.For math cards, put them on the wall, have your child stand about ten feet away from the wall.  As you call out the equation, have them run to the wall and slap the card and say the correct answer.  You can also use the fly swatter with this one as well.
3. Match alphabet cards with magnetic letters.
4.For sight words cards-have child get magnet letters to spell words
5. Sing songs while watching lyric videos.  Then hold the sight word card up when that word appears in the song.  This works great with sight word cards that have common words like "the" "there' "like" "they" and other common words.  There are lots of lyrics videos on youtube, one upbeat song is "Just Stand Up" and a slower song is "Not Even the King"  Find appropriate music your child enjoys, preview the lyrics and look for the common words that appear in the song, then sing, dance and learn.
6. Scavenger Hunt-Hide the cards in secret locations and have your child find and collect them.  After the collect them read and identify what's on the card together.
7. Spread the cards all over the floor.  Call out a letter and have your child jump or stomp on that letter.  This is great for kinesthetic learners.
8. Slap Jack-For sight words, choose words that begin with the letter A, to be the “jack”.  In this video we choose two digit numbers to be the "jack."


9. For alphabet cards, pick one card a day and try to find as many objects that begin with that letter in your home
10. For sight words cards, pick a card and come up with words that rhyme with that word, or ways to use the word in a silly sentence
11. Charades-use the cards as a starter for a charades game
12. Throw them in the air and have your child catch one-then read/identify the one they catch the cards.
13. Spread them all out on the floor, then set a 30 second timer and see how many they pick up in that time.  Read all those cards, put them back and race again.
14. Trace - Place tracing or tissue paper over the cards and have your child trace the letters, numbers or shapes.
15. Work together to arrange the cards in alphabetical or numerical order.
16. Match alphabet cards with sight word cards.
17. Make a painting out of each card and frame it.
18. Create a pretend mailbox from an old box.  And pretend each flash card is a letter that needs to be mailed.  You can put the cards in envelopes, and seal them as well.  After your child puts all the envelopes and letters into the mailbox, take them out, open the envelopes and read the letters.  You can take this activity even further by making up stories about who the letters came from.
19. Hide one flashcard at a time and play 21 questions with the cards.  All questions must be able to be answered with a yes or no.  The person holding the card answers up 21 question about the card before the other person (s) tries to guess what is on the card.  Model the game first by having your child hold the card and ask question like: Are you a five letter word? Do you rhyme with milk? Do you begin with a vowel? The switch roles.
20. Play a memory/concentration game with the cards.  If the cards you purchased didn't come with a match, purchase another set so you will have matching pairs.
  

Do you use flash cards with your children?  What age do you feel is appropriate for flash card learning ?  What has been your experience with flash cards?  Please share. : ) 


18 Creative Ways to Teach Letter Recognition To Your Toddler


20140601-110221-39741370.jpg

Toddlers are constantly learning from play, their environment and their interaction with you as a parent. There are many ways to combine letter recognition and play in a way that encourages early literacy in your child.  

1. Play dough Letters Make letters with play dough and have your child rub his or her finger across the dough to feel the shape of the letter. 

2. Sensory letter hunt Make a sensory bowl out of beans or rice and add the letters to it. Have your child look for the letters and call them out once they find them.

 20140601-103256-37976380.jpg  

3. Dance to letter songs Listen to this vowel song and hold up letters while you sing it. Alternatively you can dance on a letter mat, or take it outdoors and dance on letters written with sidewalk chalk. But get moving and have fun learning. 

 4. Play Alphabet Peek-a-Boo with a paper bag and letter sticker. 
 

5. Wear an alphabet T-Shirt Wear a shirt that has large letters on it and talk to your child about the letters they see.  

6. Find foods in the grocery store that are based on letters Sometimes we see alphabet cookies, Alpha-bits cereal, Alphabet pasta and more. Having letters to eat is a fun way to learn letter recognition. Have your child name the letters then eat them. 

20140601-095203-35523660.jpg  

7. Play with alphabet bath toys Foam letters that float in the bathtub are so much fun. They also stick to the bathroom walls. Try mixing all the letters in the tub and then have you child find the letter "B." If you have a set of upper case and lower case letters have your baby match them.

 8. Match foods to their corresponding letter Put a few letters on a paper plate and have your child point to each letter as they hold the plate. For added fun place a small piece of food next to each matching letter. S for strawberry, R for raisin, C for cereal, etc  

9. Put letters on clothespins Write letters on clothes pins and have your child try to pick up the corresponding letter from a bowl.  

10. Write letters in sand On the beach or in a park or even salt in a tray.  

20140601-111248-40368069.jpg

11. Make letters out of foods Like raisins or blueberries before eating them.

 12. Hide letters under cups And have your child guess which letter is under each cup.

13. Play alphabet games with hand puppets Have a puppet hold up a letter and talk to you child about all the things that begin with that letter.  

14. Make letters with whipped cream Create letters on a plate with whipped cream.

15. Make letters with straws

 16. Play with refrigerator magnet letters Let your child play with refrigerator magnets letters

 20140601-111246-40366185.jpg  

17. Write on a dry erase board Write letters on a dry erase board and have them erase them as they say the letter.  

18. Read books! Don’t forget to read alphabet books. Additionally everything I wrote about with teaching your child sight words can be applied to learning letters. Instead of writing the sight word on the balloon, sidewalk, etc, just write the letter.  

Do you teach you child letter recognition? What methods do you use? What activities would you add to this list? Share in the comments below.

Originally posted on Baby & Blog

Testing Your Child’s Reading Level


According to a 2009 study 67% of all US 4th graders were reading below grade level.  This has a domino effect on their performance in rest of the content areas.  For example, if a student is not reading on grade level they will have a hard time reading a history or science book that is written for their grade level.  If they are not getting the information in an understandable way from other sources such as class discussion or media, they may perform poorly in class and on exams.  There is a lot of work to be done, and some of it can be done at home.  One way to improve reading performance is to make sure students have reading materials that are matched to their reading level.   Testing the child’s reading level is an important first step in matching students with the appropriate reading level.

Why should you test your child’s reading level?
Needless to say improving a child’s reading level is quite important.  One way to help students improve their reading levels is to assess them and use the assessment results to provide them with reading materials that help them make progress.

How often should you test your child’s reading level?
Three to four times a year is sufficient.  You may need to test less based on your child’s individual circumstance. Some students who are participating in a reading intervention program can show improvements in a few months.  It is important however not to inundate children with formal assessments, because over testing can cause anxiety in both children and teens.

How to test your child’s reading level.
Testing reading level can be done formally or informally.  If your child is enrolled in a public or private school, the first thing I would suggest is to ask his or her teacher if they have given your child a reading assessment and if so check those results.
At home there are a few online resources that are helpful.   Sonlight, a website that sells homeschool curriculum has a quick assessment that goes up to about a 4th grade reading level.  Also the San Diego Quick Assessment, which is not meant to replace a comprehensive reading assessment, can give you a quick estimate on your child’s reading level.  Both quick assessment tools include very short lists of words.  When your child is showing frustration or is not able to read the words, stop to see what grade level he or she is reading at.

Another informal way of testing your child’s reading level is to use books at different reading levels. This may take longer but, if your child does not know an assessment is happening, there may be less tension.

Here are a few resources to find a books reading level:
  • Accelerated Reader provides an online search tool to find out a books ATOS level.  The ATOS level corresponds to a particular grade level in school.  For example if the book level is 2.5, then the book difficulty is appropriate for someone in the middle of their 2nd grade year.  The ATOS levels however do not assess the books content.  For example a book like The Color Purple has an ATOS book level of 4.0, meaning the difficulty level is at 4th grade, however the content is more appropriate for high school or adults.
  • Lexile is another book leveling resource, however Lexile levels are not based on grade levels.
  • Schoalstic’s website also provides a tool to search for books based on their various levels.
After you have found books at varying reading levels, observe your child reading to find out which ones are too difficult or too easy.  When your child knows all the words in the book, it is too easy.  If they stumble or struggle with the first page it is too difficult.    You can also use the “Five Finger Test” for determining if the the test is too difficult or easy.  For every word your child cannot read, place one finger down, if you have five fingers down, choose an easier book.  If they really like the book they are reading, do not do away with it, read it to them so they will learn the words in the book and continue to enjoy it.

Remember in all things, make sure to have fun reading.  For some students reading can be a struggle and an area of frustration.  Never use reading as a punishment or make it seem like a chore.  Children should enjoy reading and they get their first impression of how to feel about reading from home.

Have you ever given your child an informal or formal reading test?  Have your children been tested for reading in school?  Share your experience in the comments below.

Originally posted on Baby & Blog. 

8 Black Kids Who Completed High School and Entered College At An Early Age

Traditionally children enter kindergarten when they are five years old and graduate from high school when they are 18 years old.  However these incredible teens are moving along their educational pathway at their own pace.  Check out seven Black students who either skipped high school altogether or graduated from high school earlier than the traditional student.

1. Grace Bush is a young lady that comes from a family of high achievers.  She was homeschooled, along with her older siblings, and was astonishingly able to graduate from college before graduating high school.  (The college ceremony was scheduled before the high school ceremony, but technically she received both her diploma and Bachelor's degree in the same month.) Her mother attributes some of her aptitude to having supporting examples in her older siblings.  Grace began taking college courses at Broward College at the age of 13 and was simultaneously enrolled in high school. After graduation Grace plans to continue her education in pursuit of a Masters degree while preparing for the LSAT.  I am confident we will see her in the history books accomplishing great things.  Go head girl!
gracebush

2. Who needs high school when you can go straight to college?  By age 11, Thessalonika Arzu-Embry had enrolled in community college, after having been homeschooled through early grades, and was able to complete her bachelor’s studies at Chicago University by age 14 when most students across the USA are just entering their freshman year in high school. Thessalonika says:
“My college experience is a traditional college experience for me — it is just that I have completed it faster,” Thessalonika said. “I am very excited about joining others in having the opportunity to contribute to society in a significant way.”
Thessalonika’s mother was also a graduate student of the university, and the family plans to open a clinical practice.


3. Mathematics is commonly thought of as a difficult subject to master, and requires developmental stages to happen before children can comprehend certain concepts, but that hasn't stopped Steven Stafford from becoming a Morehouse College student before becoming a teenager.  Steven is a triple major, in computer science, mathematics, and pre-med.  He was kept on track to take advantage of his exceptional abilities by his homeschooling parents.  Steven does not like the term “prodigy” and has this to say about being exceptional:

“At the end of the day, I go home and play video games like a 13-year-old would like to play. I don't think I'm any more special than the next kid. I just learned fast because I had the resources to. My mother is the reason I was able to do that. I'm just using my potential. The only way to know it is to use it. I just love moving forward. I really do. When I slow down, I don't like it. I know I can do better than this, so why slow down?”


4. Martinique Stafford is Steven Staffords sister, who was also homeschooled.  While most 17 year olds are completing their junior year in high school Martinique was completing her freshman year at Georgia Southern University.  At 19 years old she was a Phi Eta Sigma National Honor Society inductee.  Exceptional academic achievement runs in the family.  Major kudos to the Stafford family.

5.  Saheela Ibraheem is a young marvel, at age 15 she had her pick of several top-tier colleges to attend, including MIT, Cornell, Princeton, Columbia, University of Chicago and others.  The exemplary teen settled on attending Harvard at the advice of her younger brother who also wishes to attend the school one day.  Not surprisingly, Saheela had great SAT scores to complement her vigor for academics.  She modestly explains that “anyone who’s motivated can work wonders.”


The Imafidons are commonly referred to as Britain's smartest family


6.Anne-Marie Imafidon who speaks six languages and at age 10 passed two GCSE’s (General Certificate of Secondary Education).  She went on to attend John Hopkins University in Baltimore and got her masters degree from Oxford University, all before she turned 20 years old.

7. Christina Imafidon who is one of Anne-Marie’s sisters was the youngest student in history to attend a British university

8. Samantha Imafidon at the age of 6 had passed two high school-level mathematics and statistics exams. She also became the youngest girl in the UK to attend secondary school when she was 9 years old.

How do you feel about skipping grades?  Are these young people exceptional or just normal kids who had resources, like Steven Stafford says?

Originally posted on Baby & Blog    

8 Fun Ways to Teach Your Child Sight Words

Some have said that English is one of the most difficult languages to learn because so many words do not follow a simple phonetic pattern. It is true that many words do not follow any pattern at all and we learn to read them by simply memorizing the whole word.  Sight words, sometimes called high frequency words, are words that are expected to be memorized upon seeing them, without trying to sound them out.  In beginning children's literature, sight words can account for up to 75% of the text.
There are many lists of beginning sight words you can find online to use with your child.  However, most of the words I am using with these activities are words that came up in books my daughter read recently.  When she does not immediately recognize a word in a book, I write it down and hang it up on the refrigerator, and we review it until she learns it.  One of the most important things about teaching sight words is exposure.  Exposing children to sight words through playful activities is a great way to enhance learning because people retain a lot more information when they enjoy what they are doing. Here are some fun ways to review and/or introduce sight words to your child.  Try not to treat this like a test, if they do not know the word tell them, and remember to have fun!

1. Connect 4 (or similar knock off, we got this one from Dollar Tree)
Materials: Connect 4 game, Sharpie, (Note if using the original game, you may want to preserve your chips and use removable labels to write the words)
Directions: Write the sight words on the chips, or labels.  Have you child read the words as they place them into the slots.  We had a lot of fun!  This is also a good activity for exercising fine motor skills.


2. Discovery Bottle
Materials: An empty water bottle, some sort of grain (corn meal, flour, rice, we used steel cut oatmeal), something to write the words on, I used the chips from the connect 4 game.
Directions: Fill empty water bottle up with grain and add sight words.
Have your child shake up the bottle and try to find the words.  When they find each word have them read it to you.  If the task seems too challenging, add more words to the bottle, so it will be easier for the words to show up in the grain.  You can write the same words more than once.  Repeat and enjoy.


3.  Watercolor Paint
Materials: White crayon, Paint, Paint brush, Watercolor paper.
Directions: Write the sight words with a white crayon on white paper.  Give your child the paint and brush and tell them to paint and find the hidden words. Read them the words or have them read the words as you discover the hidden words.


4. Hopscotch
Materials: Sidewalk chalk, pavement
Directions: Write the sight words inside the boxes.  Have your child jump on each word and yell the word out as  he or she jumps on each box.  Repeat and enjoy.  Alternatively,  you can read a word and have your child toss a bean bag on the box with that word, then have your child skip that box as they jump through the boxes.  This activity is perfect for the kinesthetic learner.


5. Balloons
Materials: Balloons and Sharpie
Directions: Write the sight words on the balloons.  Toss balloons in the air and say the word on each balloon as you throw it back and forth to you child.  Personify the balloons, and say catch “pier” or “I’m throwing ‘the’ to you!”  This is simple but fun, kids love balloons.  Another great activity for the kinesthetic learner.  After we were finished throwing the balloons around my daughter started dressing up the balloon with sun glasses and calling each balloon by it’s new name.


6. Find the Toy
Materials: Paper cups, Sharpie, Small Toy
Directions: Write the sight words on the paper cups.  Place them in a row and hide the toy under one of the cups.  Have your child guess which cup the toy is under.  Instead of saying “that one”  they have to say the word.  After they find the toy, mix up the words and start all over again.


7. Scoop and Match
Materials- ping pong balls, cupcake liners, spoon, sharpie, bowl or tub.
Directions-Write the sight words on the cupcake liners and the ping pong balls.  Place the cupcake liners  in a  bowl or tub.  Have your child place each ball, one at a time into the matching cupcake liner using the spoon.  Let your child take his or her time while doing this activity.


8. Easter Egg/Scavenger   Hunt
Materials--Plastic Easter eggs, paper, pen
Directions--Write the sight words on paper, (I used the cupcake liners) and hide inside the Easter eggs.  Hide the eggs and have your child find them and open each egg to find the hidden word.


Moms, have you ever tired to teach you child sight words?  What methods did you use? What activities would you add to this list? Share in the comments below :)

Share

Related Posts Plugin for WordPress, Blogger...